Serverless Discord OAuth with Next.js
OAuth is arguably the number one way to authorize a user from a third party platform. It is a brilliant solution to a difficult problem, but it can be hard to implement, especially in a serverless environment. Hopefully, this post will help you get started.
Live demo: /demos/serverless-discord-oauth
The setup
Firstly, we're going to need to create a Next.js with TypeScript app. Feel free to skip this if you "have one that you made earlier".
bun create next-app my-app --typescript
Dependencies
We will be relying on a few dependencies, the first is discord-api-types which provides up-to-date type definitions for Discord's API (who could've guessed). We'll also need axios (or whatever your favourite http lib is) to make requests to Discord. Additionally, we'll be encoding our user info into a JWT token & using the cookie package to serialize and send cookies down to the client. Finally, we'll use dayjs for basic date manipulation and pathcat to easily build urls with query params.
bun add axios cookie pathcat dayjs jsonwebtoken
bun add --dev discord-api-types @types/jsonwebtoken @types/cookie
Code
Dope, you've made it this far already! Let's get some code written
Firstly, you're going to want to open up the folder pages/api and create a new file. We can call it oauth.ts. The api folder is where Next.js will locate our serverless functions. Handily, I've written a library called nextkit that can assist us with this process but for the time being it's out of scope for this post – I'll eventually write a small migration guide.
pages/api/oauth.ts:
import type {NextApiHandler} from 'next';
import type {RESTGetAPIUserResult} from 'discord-api-types/v8';
import {serialize} from 'cookie';
import {sign} from 'jsonwebtoken';
import dayjs from 'dayjs';
import {pathcat} from 'pathcat';
import axios from 'axios';

// Configuration constants
// TODO: Add these to environment variables
const CLIENT_ID = 'CLIENT_ID';
const CLIENT_SECRET = 'CLIENT_SECRET';
const JWT_SECRET = 'CHANGE ME!!!';

// The URL that we will redirect to
// note: this should be an environment variable
// but I'll cover that in part 2 since
// it will work fine locally for the time being
const REDIRECT_URI = 'http://localhost:3000/api/oauth';

// Scopes we want to be able to access as a user
const scope = ['identify'].join(' ');

// URL to redirect to outbound (to request authorization)
const OAUTH_URL = pathcat('https://discord.com/api/oauth2/authorize', {
	client_id: CLIENT_ID,
	redirect_uri: REDIRECT_URI,
	response_type: 'code',
	scope,
});

/**
 * Exchanges an OAuth code for a full user object
 * @param code The code from the callback querystring
 */
async function exchangeCode(code: string) {
	const body = new URLSearchParams({
		client_id: CLIENT_ID,
		client_secret: CLIENT_SECRET,
		redirect_uri: REDIRECT_URI,
		grant_type: 'authorization_code',
		code,
		scope,
	}).toString();

	const {data: auth} = await axios.post<{access_token: string; token_type: string}>(
		'https://discord.com/api/oauth2/token',
		body,
		{headers: {'Content-Type': 'application/x-www-form-urlencoded'}},
	);

	const {data: user} = await axios.get<RESTGetAPIUserResult>(
		'https://discord.com/api/users/@me',
		{headers: {Authorization: `Bearer ${auth.access_token}`}},
	);

	return {user, auth};
}

/**
 * Generates the set-cookie header value from a given JWT token
 */
function getCookieHeader(token: string) {
	return serialize('token', token, {
		httpOnly: true,
		path: '/',
		secure: process.env.NODE_ENV !== 'development',
		expires: dayjs().add(1, 'day').toDate(),
		sameSite: 'lax',
	});
}

const handler: NextApiHandler = async (req, res) => {
	// Find our callback code from req.query
	const {code = null} = req.query as {code?: string};

	// If it doesn't exist, we need to redirect the user
	// so that we can get the code
	if (typeof code !== 'string') {
		res.redirect(OAUTH_URL);
		return;
	}

	// Exchange the code for a valid user object
	const {user} = await exchangeCode(code);

	// Sign a JWT token with the user's details
	// encoded into it
	const token = sign(user, JWT_SECRET, {expiresIn: '24h'});

	// Serialize a cookie and set it
	const cookie = getCookieHeader(token);
	res.setHeader('Set-Cookie', cookie);

	// Redirect the user to wherever we want
	// in our application
	res.redirect('/');
};

export default handler;
import type {NextApiHandler} from 'next';
import type {RESTGetAPIUserResult} from 'discord-api-types/v8';
import {serialize} from 'cookie';
import {sign} from 'jsonwebtoken';
import dayjs from 'dayjs';
import {pathcat} from 'pathcat';
import axios from 'axios';
// Configuration constants
// TODO: Add these to environment variables
const CLIENT_ID = 'CLIENT_ID';
const CLIENT_SECRET = 'CLIENT_SECRET';
const JWT_SECRET = 'CHANGE ME!!!';
// The URL that we will redirect to
// note: this should be an environment variable
// but I'll cover that in part 2 since
// it will work fine locally for the time being
const REDIRECT_URI = 'http://localhost:3000/api/oauth';
// Scopes we want to be able to access as a user
const scope = ['identify'].join(' ');
// URL to redirect to outbound (to request authorization)
const OAUTH_URL = pathcat('https://discord.com/api/oauth2/authorize', {
client_id: CLIENT_ID,
redirect_uri: REDIRECT_URI,
response_type: 'code',
scope,
});
/**
* Exchanges an OAuth code for a full user object
* @param code The code from the callback querystring
*/
async function exchangeCode(code: string) {
const body = new URLSearchParams({
client_id: CLIENT_ID,
client_secret: CLIENT_SECRET,
redirect_uri: REDIRECT_URI,
grant_type: 'authorization_code',
code,
scope,
}).toString();
const {data: auth} = await axios.post<{access_token: string; token_type: string}>(
'https://discord.com/api/oauth2/token',
body,
{headers: {'Content-Type': 'application/x-www-form-urlencoded'}},
);
const {data: user} = await axios.get<RESTGetAPIUserResult>(
'https://discord.com/api/users/@me',
{headers: {Authorization: `Bearer ${auth.access_token}`}},
);
return {user, auth};
}
/**
* Generates the set-cookie header value from a given JWT token
*/
function getCookieHeader(token: string) {
return serialize('token', token, {
httpOnly: true,
path: '/',
secure: process.env.NODE_ENV !== 'development',
expires: dayjs().add(1, 'day').toDate(),
sameSite: 'lax',
});
}
const handler: NextApiHandler = async (req, res) => {
// Find our callback code from req.query
const {code = null} = req.query as {code?: string};
// If it doesn't exist, we need to redirect the user
// so that we can get the code
if (typeof code !== 'string') {
res.redirect(OAUTH_URL);
return;
}
// Exchange the code for a valid user object
const {user} = await exchangeCode(code);
// Sign a JWT token with the user's details
// encoded into it
const token = sign(user, JWT_SECRET, {expiresIn: '24h'});
// Serialize a cookie and set it
const cookie = getCookieHeader(token);
res.setHeader('Set-Cookie', cookie);
// Redirect the user to wherever we want
// in our application
res.redirect('/');
};
export default handler;Cool! This is the barebones that we will need to start writing our OAuth. It's quite a lot to bite but if you break it down line by line and read the comments, it should be fairly self-explanatory. We're still missing a few prerequesits to tell Discord who we are: the client id and secret.
Obtaining keys
Our tokens can be obtained by visiting discord.com/developers/applications and registering a new application.
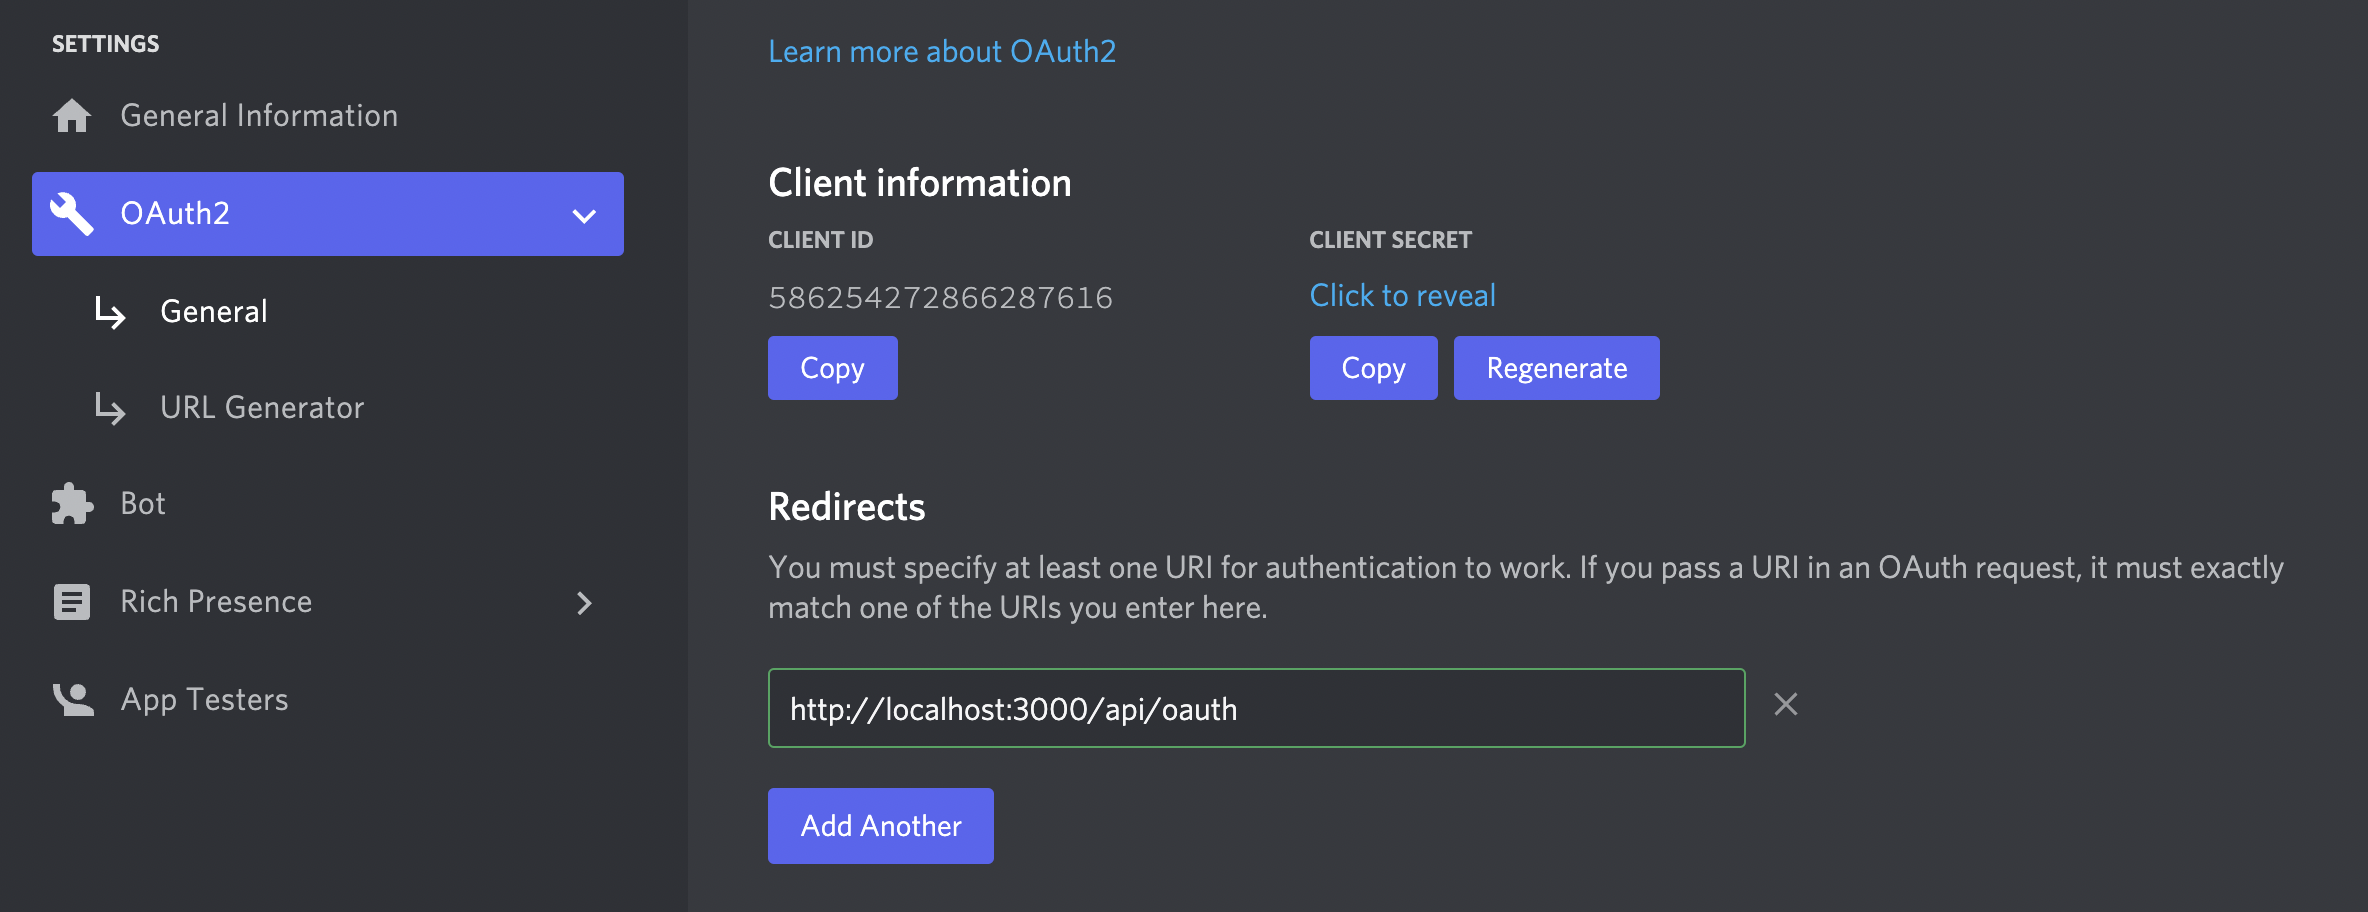
- Copy and paste your client ID into your
oauth.tsfile - Copy and paste your client secret into your
oauth.tsfile - Add your redirect URI (
http://localhost:3000/api/oauth) on the dashboard - Make sure all your changes are saved and then we are ready to test it out for the first time!
Testing it
Awesome, we've got everything setup correctly. Now we can give it a quick spin. You can start your Next.js development server if you haven't already by running bun dev in your terminal, you should be able to navigate to localhost:3000/api/oauth and successfully authenticate.
Afterwards, if you open up your browser's devtools and check for the cookie section, you should see a cookie by the name of token – this is ours! Copy the value and paste it into jwt.io to decode it and see your details encoded inside it!
Why JWT?
We've picked JWT because it lets us store information on the client side where only the server can mutate and verify that the server created it. This means users cant modify the data inside a JWT token, allowing the server to make guarantees about the data encoded.
Environment variables
Okay, we're almost there. Final stretch
Right now, we have our constants defined in this file which is fine for prototyping but it now means that if you want to push your code to github, for example, your client secret and perhaps other private information will be publicly available on your project's repository! The solution? Environment varibles.
Environment variables are bits of information that are provided to a process at runtime, it means we don't have to store secrets inside of our source code.
Thankfully, Next.js makes it super easy for us to use environment variables with something called an env file.
Creating our env file
Firstly, make a new file in your project's file structure called .env and add the content below. the format for env files is KEY=value. You can use openssl rand -hex 64 to generate a JWT secret.
CLIENT_ID=<our discord client id>
CLIENT_SECRET=<our discord client secret>
JWT_SECRET=<a secure, randomly generated string>
And finally, we need to update our code to make sure that our api/oauth.ts file can use the newly generated environment variables.
const CLIENT_ID = process.env.CLIENT_ID;
const CLIENT_SECRET = process.env.CLIENT_SECRET;
const JWT_SECRET = process.env.JWT_SECRET;
const CLIENT_ID = process.env.CLIENT_ID;
const CLIENT_SECRET = process.env.CLIENT_SECRET;
const JWT_SECRET = process.env.JWT_SECRET;And that should be all good! I'll be writing a part two and three later on that will cover accessing the JWT from the server and also deployment to vercel.
Thanks for reading!
